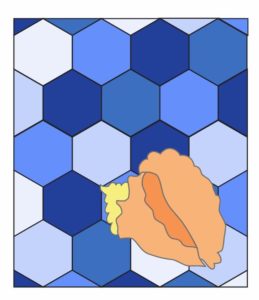
You can almost hear the ocean when you gaze at the conch shell applique on a sea of blue hexagons. Free-motion stitching adds detail to the shell. Piece together the background for this quilt with hexagons then add the applique creating a simple but dramatic design.
Designer: Rebecca Kemp Brent
Finished Size: 27 3/4″ x 32″ (70.5cm x 81.25cm)
Supplies
Cotton Solids*:
1/2 yd (.46m) each of 5 assorted blues (at least 2 yds (1.8m) total)
1/4 yd (.23m) medium apricot
1/8 yd (.16m) dark apricot
1/8 yd (.16m) pale yellow
1/4 yd (.23m) blue for binding
1 yd (.91m) fabric for backing
Dual Duty XP All-Purpose thread (blue)
Coats Machine Embroidery thread (various apricot, pale yellow, and blue colors**)
1/2 yd (.46m) of 18″(45.7cm)-wide paper-backed fusible web
38″ x 34″(96.5cm x 86.4cm) piece of batting
*We used FreeSpirit Designer Essential solids. Fabric colors used in the sample quilt are CSFSESS.CRYST, CSFSESS.MIRBL, CSFSESS.MARIN, CSFSESS.INDIG, CSFSESS.VELVE, CSFSESS.CHAMO, CSFSESS.BURST, AND CSFSESS.MANGO.
** Machine-embroidery thread colors are 3 Ciel, 17 Buff, 390 Peachy Frost , 358 Hot Coral, 1500 Orange Coral, and 530 Chamois.
Cutting
From the assorted blues, cut a total of:
18 hexagons (pattern A)
4 half hexagons (pattern B)
6 half diamonds (pattern C)
2 quarter diamonds (pattern D)
2 quarter diamonds, reversed (pattern D, reversed)
From the binding fabric, cut:
3 strips, 2 1/4″(5.7cm) x width of fabric
Hexagon and Applique Templates
TIP
Cut extra hexagons (pattern pieces A-D) for flexibility in arranging the colors for the background.
Preparing the Appliqués
- Print the appliqué patterns onto four pieces of 8 1/2″ x 11″ (20.3cm x 28cm)paper. Be sure the scaling options are set to Full Size or No Scaling for your printer, and use the 1″(2.5 cm) test square as a check to be sure the patterns have printed correctly. Because the pattern pieces are large, you’ll need to assemble them; use the red lines as alignment guides.
- Trace the appliqué shapes onto the paper side of the fusible web. The patterns have been reversed so that they will appear right-reading on the finished quilt. There are additional lines on some of the pieces to indicate where overlapping appliqués will be placed.
- Roughly trim around each shape. Following the manufacturer’s instructions, fuse the shapes onto the wrong side of the corresponding fabrics.
- Cut out each shape, following the traced lines exactly.
- Remove the paper backing from each shape, but reserve the paper to use as a guide when fusing the pieces to the quilt.
Seam allowances are 1/4″(.6cm). Press seams open to produce a flatter background for the appliqué.
Instructions
- Arrange the blue pieces on a design wall or flat surface to achieve a pleasingly random arrangement of colors. Sew the hexagons and half-hexagons together in horizontal rows. Join the rows to make the quilt top. Add the half- and quarter-diamonds along the edges to square the quilt top.
 Figure A
TIP
Each hexagon has four bias edges and two that lie on the straight grain of the fabric. Keep the straight-grain edges parallel to the outer edges of the quilt, and be careful not to stretch the bias edges as you assemble the hexagons.
- Arrange the pieces of the shell appliqué on the assembled background, about 3 1/2″ (9 cm) from the side and bottom edges. Exact placement isn’t essential. Apply the pieces in numerical order as shown, overlapping them as indicated on the patterns. Fuse in place.
 Figure B
  Figure C
- Drop or cover the feed dogs. Set the machine for free motion stitching and thread the needle with dark pink machine embroidery thread. Sketch the area at the center of the shell with thread as shown in the photos, using rows of straight stitches perpendicular to the shell lip. Change the thread color to dark apricot and add additional shading to the area.
- Set the machine for a satin zigzag stitch 5.0-7.0 mm wide and 0.2-0.4 mm long and, with the dark apricot thread still in the needle, stitch along the edge of the dark lip appliqué, sewing on top of the free motion stitches.
- Add details to areas of the shell as shown in the photos, using free motion or machine-guided stitches. The sample uses a contrasting light-brown thread to emphasize some of the details, with others stitched in matching colors.
 Figure D
- Overcast the edges of each appliqué piece with satin stitching in matching thread. If your machine has satin stitches with one or both uneven edges (that is, a variable width), you can use those stitches to indicate rough and smooth edges of the shell while simultaneously feathering the stitching into the appliqué area.
 Figure E
TIP
You may want to slide a layer of tear-away interfacing under the appliqués to support the fabric as you stitch. However, the fusible web may provide enough support on its own. Stitch a sample with scrap fabrics to be sure.
- Layer the quilt top, batting, and backing. Quilt as desired; the sample’s background is quilted with meandering, mostly horizontal lines to suggest sky and surf. Additional quilting outlines the appliqué sections and echoes some of the shell details.
 Figure F
- Trim the backing and batting to match the quilt top.
- Join the binding strips to make one continuous length and bind the edges of the quilt.